 Certain programmers, it seems, are horrified by the prospect of non-geeks taking up the scepter of coding know-how. With knowledge comes power. With power you gain independence.
When you learn basic HTML code you can fix unwanted formatting, add extra spaces, create line breaks, or introduce links and images. All by yourself.
We’re not talking full-on programmer or hard-core code monkey here. Learn basic HTML code and you can find the freedom to not only fix things, but you can add these links or images to your sidebar in the text widgets as well.
Basic HTML Code
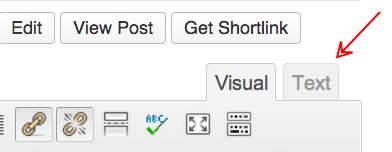
Click on “Text,” your HTML (which stands for Hyper Text Markup Language) editor to see how a post looks compared to the visual or plain text where you type your posts. It’s in the upper right of the New/Edit Post menu in WordPress.
HTML code can normally be found between the carrots or angle brackets, like this: <html>. HTML tags are the keywords surrounded by the angle brackets.
- HTML tags often come in pairs: <p> and </p>.
- The start tag is the first tag and the second tag is the end tag.
- The end tag looks like the start tag but with a forward slash before the keyword or tag name.
- Start and end tags are also called opening tags and closing tags.
Everything that is found between an opening and closing tag is “wrapped” inside and will be displayed in the visual editor according to that type of tag. For example, when you want something bold, everything found between the start and end tag will make it bold, like this:
- <strong>This sentence will be bold!</strong>
Here are more examples of simple HTML with start and end tags:
- <p>This is the beginning and end of a paragraph.</p>
- <em>This sentence will be in italics, or “emphasized.”</em>
- <h1> This is the title or header.</h1>
- <h2>This is the subheader.</h2>
- <h3>This is another subheading.</h3>
If you use multiple tags to alter text, be sure to keep the end tags in the same order as the start tags.
There are also tags that don’t require both a start and end tag:
- </ br> Use this HTML tag to create a line break, or to skip a line
- <hr> This gives you a line across the page and stands for horizontal reference.
- To add a single space type these 6 characters in: (This stands for non-breaking space.)
HTML for Links
Link tags make those blue-colored (or occasionally other-colored) and sometimes underlined hyperlinks that you can click on and go to another website or another page. Link tags in HTML come in a set of two beginning with <a href and ending with </a>. Here is an example of a hypertext link, also known as an anchor text link:
<a href=”your url here”>your anchor text here</a>
When creating a link to Google.com it will look like this:
<a href=”http://www.google.com/“>Google</a>
This is what it will look like in your text: Google
- The “a” stands for anchor and starts the link to another page.
- The “href” stands for hypertext reference and tells the browser where the link is going
- Add the full URL address to where the link goes. It has an equal sign in front of it and is enclosed in quotes because it’s an attribute of the anchor tag, which is a command inside of a command.
- The anchor text is what appears on the page that the viewer will read and be able to click. Always write something that names the link instead of generic terms such as “click here.”
- The “/a” ends the link command.
For a Link to a New Window
If you want the link to open in a new window (which is what you want your links going to a different site to do), you need to add a target, like this:
<a href=”http://www.google.com/” target=”_blank”>Google</a>
Now your link will open in a new window: Google
For a Link With Pop-Up Text
If you want to add text that pops up when you hover over the link with your mouse, you need to add a title, like this:
<a href=”http://www.google.com/” title=”Google me!”>Google</a>
Now try hovering over the link: Google. (I know, it’s so cool, isn’t it?)
HTML for Images With the <img> Tag
This is the tag you use when you display an image:
<img src=”image.gif” alt=”name of image”>
An image of your favorite cat photo might look like this:
<img src=”favoritecat.gif” alt=” Cutest Cat Ever”>
- “Src” stands for source and the “image.gif” is the url of where the image is stored. Your WordPress site has a media library where you can upload and store images for display.
- The “alt“ attribute specifies the alternate text for the image if the image cannot be displayed for some reason.
To Shift the Image to the Right
When you want to shift the image to the right you need to add that information to the end of the tag, like this:
<img src=”url of image” alt=”image name often keyword” align=”right” />
You can change the “right” to “left” or “center” to float the image wherever you want it. Now you are no longer a Rookie, and you can add Beginning HTML Expert to your resume.
