Web Savvy Marketers

  • About
  • Services
    • Strategic Planning
    • Marketing Programs
    • Full-Service Web Design and Development
    • Content Marketing
  • Industry
  • Portfolio
  • Blog
    • Tools & Tips
      • Google Tips
      • Internet Scams
      • Motivational
      • Tips for a good website
      • Website Writing Tips
    • Marketing
      • Internet Marketing 101
      • Philanthropy
      • Search Engine Optimization (SEO)
      • Social Media
      • Web design/Internet Marketing
    • Web Design
      • E-commerce
      • Website Maintenance
  • Contact Us

What’s a Widget?

March 4, 2018 Beth Devine

Remember when a widget was a thing you called something when you couldn’t remember what to call it?

Not anymore. WordPress turned the widget into a real thing. Or is it?

I’ve found that many new WordPress users have a little trouble understanding the Widget concept and how it fits into their website.

What is a WordPress widget?

The widget is a section under Appearances where you can add content to a section of the website. Typically and historically the widget areas were designed to be used on  parts of the website that appear on many pages. Sections like the primary sidebar or the footer area are typical places where you might want to include data on many pages. Data you may want to include on many pages might be your address, a menu, e-mail sign-up form, a contact button, Social media links…you get the idea. By using a widget you only set up the data once and it appears on in multiple locations.

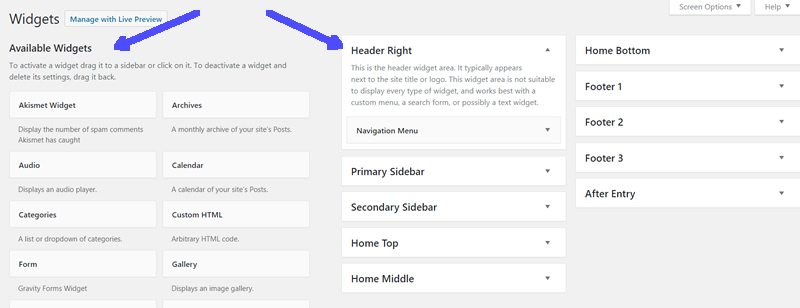
When you open up your Widget area under Appearance>Widgets, you’ll see something similar to that shown above, with the Available Widgets on the left side and the Widget Areas on the right. The basic concept is to pull the widget you want to use from the available Widgets into the widget area where you want the widget to display.

The Available Widgets may vary by theme or if there are plug-ins installed, but I’ve found that I use these types of widgets pretty frequently:

  1. Custom Html – used for placing code or scripts from another source (such as an email sign-up form
  2. Image – allows you to insert an image from your media library
  3. Navigation Menu – Adds a custom menu
  4. Text – Add text – handy for addresses, phones numbers, etc.
  5. Search
  6. Video
  7. Audio

I have used the Genesis framework frequently over the years so there are several Genesis specific widgets I like to use:

  1. Genesis Featured Page Advanced – allows you to pull information from a page into a widget area.
  2. Genesis Featured Posts – allows you to pull posts or post excerpts into a widget area.
  3. Simple Social Icons

The Widget Areas also vary by theme. Often when I use the Genesis framework, the theme home page is often set up using widget areas. This allows you to pull information to the home page dynamically, instead of having to update the home page when you create a new post or event. For example, the Testimonials Section and Marketing Tools and Tips From Our Blog section will update automatically if a new testimonial is added or if we add a new Featured post to our website.

So a Widget is a “do-hicky” or a “thing” that you use to put content into multiple places or to update content dynamically in multiple places. “Widget” seems like the perfect name for it.

More information about widgets 


Filed Under: Carolyn's Posts, Featured, Tools & Tips, Wordpress Tutorials

How to import a calendar – dates and all! And how to turn off comments.

February 26, 2018 Beth Devine

Last week we launched a newly designed website. It was a fairly large website with the Timely All-in-One calendar plug-in. There were over 2000 calendar entries that we ported over to the new site.

Initially we used the WordPress Importer (located under Tools in the dashboard) that is part of the WordPress core installation to export the data from the old site and import it into the new site. That worked – kind of – but it didn’t import the dates correctly, so they didn’t appear on the calendar. Kind of important for calendar items.

What did work was using the Timely Feed option. To do that go to the calendar on the old site, click on Subscribe, then right click Add to Timely Calendar > Copy link address. Then go to the new site, under Events>Calendar Feeds. Type the URL you just copied into the feed field, check the options you desire and click the Add new subscription.

Speaking of options. There is a checkbox for Allow comments on imported events, which I apparently did not check. Oops! It turns out the client didn’t want comments.

How to turn off comments for blog posts and events.

There is a feature in WordPress to turn off comments for all posts – including past posts.

Here’s how:

  1. Go to All Posts or in this case All Events.
  2. Click the checkbox that selects all the posts or events.
  3. Click and apply Edit under Bulk Actions dropdown.
  4. Set Comments to Do Not Allow
  5. Click Update

That should work in most cases, but it didn’t in this case. I think because of the way we imported the data through the subscription feed.

So here’s my go to fix in cases when WordPress won’t do as we’d like.

Change the display through CSS.

In this case I wanted to eliminate the display of the comment count and comment display box. To find out the CSS class that presents these options, right click on the area you want to eliminate, click “Inspect”. Look through the code to find the CSS classes that define the styles for these elements.

In this case it was  “.comment-text, .comment_meta-container, .comment_container, and .comment count”. So I added the following code to the CSS styles:

.comment-text,

.comment_meta-container,

.comment_container,

.comment-count {

display:none !important;

}

Wala! Comments section is gone.

Make sure you’re modifying your CSS by using the Custom CSS option of your theme instead of updating the themes original style sheet.


Filed Under: Carolyn's Posts, Featured, Wordpress Tutorials

How to Stay Safe With WordPress Updates

April 22, 2015 Beth Devine


wordpresssecurity

WordPress is a fantastic content management system and blogging platform, but like most popular open source software it can be vulnerable to certain malicious activities–especially if your software, theme and plug-ins are not kept up to date and running the most current version.

What kind of malicious activities might occur?

  • Someone could install files with malicious scripts within your WordPress installation that send out SPAM. This could lead to an exceptional load on the hosting server causing it to slow down website performance and the volume of SPAM can cause the mail server to be blacklisted. The blacklist could prevent other folks from receiving your emails that you send causing you to lose business. And it can be time-consuming to get a server off a blacklist.
  • A malicious script redirects your site to another (SPAMMY) location causing you to lose business, damage your reputation and hurt your search engine rank.
  • Any number of other mean-spirited activities the hackers decide to wreak upon your site that will cause you to lose business, or your reputation or both.

It’s important to protect your website.

We’ve talked about WordPress security before (and will probably talk about it again).  See No-Worries Website Security , More Password Hacking Methods and How to Stay Safe, How to Change Your WordPress Username, and How To Prevent Zombie Hack of Your WordPress Site, and 6 Ways Your Site Is Hacked and What To Do About It for some previous posts.

There are many tools and plug-ins useful for keeping you site secure, but today we’re going to talk about managing WordPress updates. Let’s get started.

How to Manage Your WordPress Updates

WordPress makes it very easy to keep your website up to date. The most important thing to ensure is that you have a current and complete backup of your database and your files.

There are many ways to backup your website, but here are the easiest and most common.

  1. You can create a backup from your web hosting cPanel.
  2. There are backup plug-ins that you can install in your WordPress dashboard that will automatically backup your site at set intervals.

Once you ensure that you have a current backup, it’s very easy to complete the updates from within your dashboard. All updates for plug-ins, themes and WordPress versions will be noted under WordPress updates in your dashboard. Simply click the update links and in most cases the site will begin updating.

The Order of Operations

In my experience I find it best to start with the plug-ins and update all the plug-ins that have updates available. Once those have updates have completed, move on to the theme (see theme warning below) and update it, then update WordPress itself.

Theme Warning – Why it’s important to use child themes.

Ensure that your theme hasn’t been modified or your updated theme may not display your website the way you want it to look. We usually build websites with all the style modifications made to the child theme so it’s less likely to cause a problem when updating the theme.

OOPs! Something went wrong!!!

You’ve made your updates but now…

  1. Your website doesn’t look right – See theme warning above.
  2. You can’t even see your website and you see a “Fatal Error” message(s) instead.

Now what do you do?

Disable Plug-ins.

Sometimes a plug-in doesn’t play well with the current versions of WordPress. If that’s the case, it might actually make your website unavailable. Instead of seeing your website, you’ll see a fatal error message.  So, if you’re seeing a fatal error message, the first thing to do would be to disable all the plug-ins. Probably the easiest way to do that is to login to your cPanel and find your plug-ins directory and disable it. An easy way to disable it is just change the name on the plug-in folder. Use something like Disabled-plugins.

Did that fix it?

If yes, continue reading this section. If not, continue on to restore your website from the backup.

You’ve determined that your website works with plug-ins disabled so you know that one (or more) of the plug-ins caused the problem. You need your plug-ins so you’re going to enable them one by one to find out which plug-in caused the problem. To do that create a new folder in your cpanel called plugins (don’t get creative here – put it in the same location as the old plugins folder was located.) Copy over each plugin folder from the disabled-plugin folder to the plugin folder. Check after moving each plug-in to the active plugin folder to see if the website is still working. When the website breaks – you’ll have discovered which plug-in broke the website. Now you need to consider whether you really need that plug-in or not.

Restore your website from a backup.

Here’s where it’s important to have you backup database and files.

In your cpanel:

  1. Overwrite or restore your WordPress files with the backup files you saved.
  2. Restore the old database you saved or create a new database and import your backup database into the new database. Change the wp-config file to point to the corrected database.

Your website should now be restored to the state it was in prior to trying to update it. So now you’re back to square one with a working but outdated WordPress installation. Chances are during the restoration you discovered if it was a outdated plug-in or outdated theme that created the havoc during updates. It’s likely you’ll want to replace the plug-in and/or theme with something that is compatible with the current WordPress version.

Filed Under: Featured, Security, Tools & Tips, Website Maintenance, Wordpress Tutorials

WordPress Tutorial – Media Center

January 30, 2012 Beth Devine

Filed Under: Tools & Tips, Wordpress Tutorials

WordPress Tutorial #3 – How to insert a link

November 18, 2011 Beth Devine

This morning I had two different clients ask how to insert a link in the text on the WordPress website.  This short video demonstrates how to insert a link to other pages within your website and to a web address outside of your website.

Filed Under: Wordpress Tutorials

10-Minute WordPress Tutorial #2

November 3, 2011 Beth Devine


This tutorial is for beginners just learning how to add pages to their WordPress website. Topics include adding a page, copying text into the page, adding a text widget to the sidebar, and adding a menu item using the custom menu feature. The demonstration site in this tutorial has the Enterprise /Gensis Theme by Studiopress installed.

Filed Under: Wordpress Tutorials

10-Minute WordPress Tutorial #1

October 24, 2011 Beth Devine

This is the first in a series of video tutorials I have planned about managing your WordPress website.  This video will cover basic dashboard navigation with relation to how to add and edit a post.

Filed Under: Wordpress Tutorials

Recent Posts

  • Reshoring: What and How?
  • It’s Manufacturing Month!
  • Cybersecurity’s Role in Manufacturing
  • The Ultimate Tool for Saving Manufacturers Time, Money, and Human Capital
  • Sales and Marketing: Collaboration is Key to Success – Part One

Search this site

Call Us

860-432-8756

Our Location

222 Pitkin Street, Suite 125
East Hartford, CT 06108
Phone: 860-432-8756

Services

  • Marketing Services
  • Strategic Planning
  • Internet Marketing
  • Multi-Media Productions
  • Marketing Programs

Talk to Us

Follow us, subscribe to us, email us, or call us at 860-432-8756. We’ll use our Super Savvy Tool Belt to stay in touch however you prefer.

  • Email
  • Facebook
  • LinkedIn
  • Pinterest
  • Twitter
Sign Up for Email Updates
For Email Marketing you can trust.

Copyright © 2025 Web Savvy Marketers, LLC · 222 Pitkin Street, Ste. 125 · East Hartford, CT 06108 · 860-432-8756 ·
Privacy Policy | Terms & Conditions | Cookie Policy · Log in